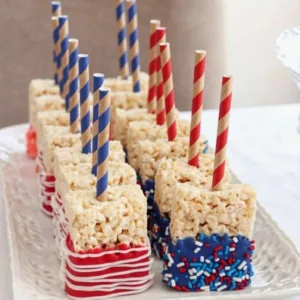
Skipping the traditional, tedious multi-step baking process on a sweltering summer afternoon is a massive victory for anyone craving ultimate comfort food on a frantic holiday, these spectacular 4th of July Rice Krispie Treats completely revolutionize the classic snack table, transforming simple marshmallow cereal squares into a vibrant, high-end restaurant experience with practically zero effort. Wrapped in stunning candy coatings, festive sprinkles, and striped paper straws, they deliver maximum patriotic cheer straight to your backyard celebration.

Instead of washing a sink full of heavy baking pans or managing hot ovens on a humid evening, this smart method lets you shape and decorate your treats without any baking required. As the custom red and blue candy shells snap to a crisp finish, they lock in the chewy, gooey integrity of the classic marshmallow center, ensuring every single bite stays beautifully moist, uniform, and deeply satisfying.
Whether you are seeking to revitalize your standard summer holiday routine, looking for an effortless cookout centerpiece to surprise a hungry household, or pulling together a cozy sweet treat for a neighborhood block party, this foolproof design hits the spot flawlessly.
Why This No-Bake Straw Pop Strategy Always Wins
The secret behind a truly legendary holiday snack platter lies in balancing festive presentation with casual, mess-free handling for guests of all ages. Traditional sheet treats run the risk of melting or turning sticky when passed around an outdoor gathering. This recipe completely bypasses that common kitchen pitfall by utilizing sturdy, decorative paper straws inserted into the base of each square. This transforms a humble pan dessert into a brilliant, grab-and-go finger food pop that keeps fingers completely clean.
Additionally, this sweet dessert serves as an absolute champion for time-saving party prep and budget-friendly entertaining. It relies entirely on accessible pantry and baking aisle staples like crispy rice cereal, fresh marshmallows, butter, and vibrant candy melts. Because the molded base holds its structure beautifully, you can press, slice, and skewer your pops a full day in advance, storing them covered at room temperature until you are ready to dip and decorate.
Finally, the customizable layout makes it an absolute dream for picky family members and creative kitchen modifications. Because the sweet marshmallow foundation is so universally loved, you can easily adapt the decorations to match your celebration’s exact theme. Swap out the sprinkles for crushed cookies, add a drizzle of dark chocolate, or try different colored candy melts to instantly transform this humble vintage bake into your own signature holiday style.
Essential Ingredients
You only need a handful of familiar grocery staples, simple pantry items, and bright decorations to construct this comforting classic.
-
The Sturdy Crisp Base: 6 cups of crispy rice cereal and 4 tablespoons of unsalted butter.
-
The Velvet Marshmallow Binder: 10 ounces (about 1 bag) of fresh mini marshmallows and 1 teaspoon of pure vanilla extract.
-
The Patriotic Candy Shell: 1 cup of royal blue candy melts and 1 cup of bright red candy melts.
-
The Festive Holiday Accents: 1/2 cup of white cookie icing (for drizzling), 1/4 cup of red, white, and blue sprinkles, and 12 to 16 colorful striped paper straws.
Step-by-Step Instructions
-
Prep the Foundation Pan: Lightly coat a 9×13-inch baking pan with non-stick cooking spray or line it with parchment paper, leaving a slight overhang on the sides for easy removal later.
-
Melt the Chewy Binder: Melt the 4 tablespoons of unsalted butter in a large stockpot over low heat. Add the mini marshmallows, stirring constantly with a sturdy spatula until they are completely melted, smooth, and velvety. Remove from heat and stir in the vanilla extract.
-
Fold the Textures Together: Immediately dump the 6 cups of crispy rice cereal into the warm marshmallow mixture. Fold gently from the bottom up until every single grain of cereal is thoroughly coated in the sticky binder.
-
Press and Cool: Transfer the mixture into your prepared pan. Using a sheet of wax paper or a greased spatula, press the treats down evenly into a smooth, uniform flat layer. Let the pan rest undisturbed at room temperature for 30 minutes to firm up cleanly.
-
Slice and Skewer: Lift the treat block out of the pan and slice it into uniform rectangular bars. Carefully push a decorative striped paper straw into the bottom center of each bar to create individual dessert pops.
-
Melt the Festive Shells: Place the red and blue candy melts into separate microwave-safe bowls. Microwave each bowl in 30-second intervals at 50% power, stirring thoroughly in between, until the candy coatings are completely smooth, glossy, and melted.
-
Dip to Perfection: Take half of your skewered treat pops and dip the bottom third directly into the blue melted candy, immediately coating the wet surface in red, white, and blue sprinkles. Take the remaining half of your pops and dip them into the red melted candy. Place the decorated treats onto a sheet of parchment paper.
-
The Final Drizzle and Set: Give your red-dipped pops a stunning look by snip-cutting the corner of your white cookie icing bag and drizzling fine, uniform white stripes across the red shells to create a gorgeous striped pattern. Let the pops rest for 15 minutes until the candy coatings are completely firm, set, and ready to serve!
Festive Red, White, and Blue 4th of July Rice Krispie Treats
Ingredients
- 6 cups crispy rice cereal
- 10 oz bag mini marshmallows
- 4 tablespoons unsalted butter
- 1 teaspoon pure vanilla extract
- 1 cup royal blue candy melts
- 1 cup bright red candy melts
- 1/2 cup white cookie icing
- 1/4 cup red, white, and blue sprinkles
- 12 count striped paper straws for treat pops
Instructions
- Line a 9x13-inch pan with parchment paper and lightly coat it with non-stick cooking spray.
- Melt the butter in a stockpot over low heat. Add the mini marshmallows and stir constantly until completely smooth and melted. Remove from heat and mix in the vanilla extract.
- Fold the crispy rice cereal into the warm marshmallow mixture until every piece is evenly coated.
- Press the mixture gently into the prepared pan using wax paper to create an even layer. Let cool for 30 minutes.
- Slice the cooled block into 12 rectangles and insert a striped paper straw into the bottom center of each treat.
- Melt the red and blue candy melts separately in microwave-safe bowls using 30-second bursts at 50% power, stirring between intervals until smooth.
- Dip half of the treat pops into the blue candy coating and decorate immediately with patriotic sprinkles. Dip the remaining treats into the red candy coating.
- Place the treats on parchment paper, drizzle white cookie icing stripes over the red pops, and allow the coatings to set for 15 minutes before serving.
Notes
Meal Planning & Pairing Ideas
Because this vibrant red, white, and blue dessert pop features a remarkably sweet, rich, and fun profile, it functions as a magnificent anchor for a diverse summer holiday menu rotation or a casual weekend party buffet table.
Looking to map out a comforting, family-approved menu lineup for Independence Day or a summer barbecue? Alternate this refreshing crisp treat with other quick patriotic baking masterpieces or fresh snack boards. Cycle through festive favorites like an elegant Easy 4th of July Berry Trifle Recipe, a colorful 4th of July Sugar Cookie Flag Fruit Pizza Recipe, or a decadent tray of Festive Patriotic Fudge Brownies Recipe. If your holiday guests love casual grazing table spreads, you can swap things up with a beautifully arranged American Flag Charcuterie Board Recipe or a quick, colorful Red White and Blue Candy Salad Recipe.
Want to design an epic outdoor backyard cookout spread filled with vibrant themes later in the summer month? For a quick option to accommodate a large crowd, a big bowl of Creamy Red White and Blue Cheesecake Salad or an Easy Classic Fruit Pizza Recipe hits the spot perfectly. To round out a festive holiday table display, serving these adorable marshmallow pops alongside a stunning Easy Berry Flag Platter Recipe provides an unbeatable, bright alternative that your party guests will absolutely adore!
Frequently Asked Questions
How can I make sure my treats stay soft and chewy? Achieving a perfectly soft, gourmet marshmallow texture depends entirely on keeping your stovetop heat low and avoiding over-compacting the cereal in the pan! High heat cooks the sugar molecules in the marshmallows too quickly, turning them hard when cooled. When transferring the mixture to your pan, press down just enough to create a uniform layer rather than packing it firmly into a dense block.
Why are my paper straws sliding out of the pops? If your straws are slipping out of the crisp base, it usually means the treats are too warm or the hole is too loose. To lock them into place flawlessly, dip the tip of your paper straw into a tiny bit of the melted candy coating right before pushing it into the base of the bar. The candy will act as a delicious, super-strong food glue that sets inside the treats, keeping the pop firmly anchored as guests hold it!
Can I store these decorated holiday pops in the refrigerator? Storing decorated crisp pops in the refrigerator is highly discouraged. The cold, damp air of a refrigerator introduces excess moisture into the pan, which will break down the delicate starches of the rice cereal and turn your treats soggy or soft. Instead, store them in a single layer inside an airtight container at room temperature to ensure they stay perfectly fresh, crunchy, and glossy for up to three days!